To achieve an even and perfect blond is difficult, but the difficulties of the "newly made" blondes do not end there. Over time, hair grows, and dark roots become more and more visible. They spoil the look and require staining. How to lighten hair roots at home, recommendations from experts, as well as what problems you may encounter, read on.
Choosing a paint to lighten
 Lightening the roots for blondes is a regular procedure. Over time, hair grows and gives a natural, darker shade. This does not look attractive at all, and requires immediate remediation.
Experts recommend once a month to carry out the correction of regrown roots. If the procedure is performed less frequently, the transition will be noticeable more and it will be more difficult to correct it.
There are several basic bleaching agents:
Tint lightening shampoos, foams and cream-gels will give a lighter shade to curls, so they are not used for the correction of roots. Professionals recommend using more effective and resistant products - it is paint and brightening powder.
The choice of color depends solely on the natural color of the hair. It is not recommended to rush to choose a means for lightening the roots on your own, trust not a blonde friend, but a specialist. He compares his own shade and the desired one, selects the percentage of oxidizer and the shade of paint itself. For dark roots it is possible not to do with a single paint; in addition, you will need a tinting dye.
To date, girls for the correction of the root zone prefer professional tools, considering them to be more effective for resolving issues. Such products are sold in special stores or only from a distributor. In addition to the dye, a special activator or oxidant is required, it is needed 2 times more than the brightening powder. Professional staining of curls includes Wella, Londa, Estel and Revlon.
Tip! The first clarification of regrown roots is recommended to be entrusted to professionals. Only they will select the most appropriate tone and brand of paint, will acquaint you with the technique of applying a lightening agent and teach you how to avoid yellowing.
For home staining, it is not the mask class that plays a big role, but that it does not leave yellowness. Cosmetic companies have met and offered a considerable choice of products for bleaching roots without preserving the yellow effect. This is the Color Naturals series from Garnier, the Natural & Easy line or the Brilliance line from Schwarzkopf. You can try products from L’Oreal from the Casting Creme Gloss series or the illuminators offered by Syoss.
For homemade clarification of the roots, use products marked "yellowish", from a series of cold or ashy shades.
Useful video phased discoloration of regrown roots, followed by toning:
What options for clarification are there?
There are three ways in which you can change the color of regrown dark roots.
The first is, of course, to contact salon for professional coloring. As a rule, it is the safest option with a predictable ending. We get roughly what we need.
But the main disadvantage is the question of price.
Such a procedure can cost up to 5000-10000 rubles. Agree, a lot of money. To pay them every month for the correction of regrown roots is wasteful.

The second way is self tint professional and popular paints. You can buy them in the store at various prices. The effect, of course, will also be different (the price still affects the quality). Best to choose professional tools. They cost more, but in any case, it will be cheaper than going to the hairdresser.
Do not apply to clean hair, preferably a couple of days don't wash your hairto protect the scalp.
One more thing - you should always strictly follow the instructions, so that the whole procedure goes without harm to the skin. I advise you to use a tint balsam after applying the paint in order to remove possible yellowness and to make the color even.
Dyes are not the only way to care for grown hair. There are several options. For example, brightening cream or powder. The advantages of these options in their price. They are quite affordable, simple and popular means than you can change the tone of the roots. Again, they are easy to use at home. But it is always a tape measure, what color in the end it will turn out, will there be a yellowness, is the color chosen correctly?
If you decide to fight with the grown roots at home, I advise you to first consult with professional colorists, who will tell you how to paint curls without harm and beautifully.
Procedure
- Before dyeing don't wash my hair two or three days. For some, this is still a test. As a salvation, you can use a dry shampoo.
- Mix the ingredients in a plastic bowl.
- I take one part cream and one and a half oxidant, to get yellowness, although the instructions say 1 to 2. Unfortunately, the proportion recommended by the manufacturer does not give a very white color - it is slightly yellow, and since I paint my hair blue, the paint will turn green on the yellow roots.
- I apply a black brush on the photo, strand by strand, hold for 30 minutes, then wash my hair using a shampoo and a restoring mask.
Advantages of this method
- The advantages of such components in their careful effect on the skin.
- They not only can lighten hair by 2 tones (and some tools can do this for 3-4 tones), but also feed them.
- Low cost, naturalness and relative harmlessness. Your curls will become obedient, soft.
List of funds
Here are a few products that help lighten the regrown hair. on a few tones:
- Chamomile decoction
- Cinnamon (it is mixed with honey and hair balm, the mixture is applied to the head and kept under cellophane for about an hour)
- Kefir masks,
- Masks from egg white and lemon.
After the lightening procedure, I recommend moistening the tips with coconut oil and making a regenerating hair mask.
How do you lighten your roots? Share your feedback and recipes! I am very interested to know them! In the meantime, I say goodbye to you, but soon I will be back with a new useful topic! Don't forget to subscribe to the blog and tell your friends about it!
Lighten dark and light roots
The selection of the clarifier is an important step in the staining of the root zone. But It is worth noting that more and more confidence hairdressers and clients give powder clarifiers than ready-made paints. The brightening powder must be diluted with an oxidant. To determine the optimal dilution ratio and the percentage of oxidant, provide a professional.
The whole process of bleaching the roots can be divided into 5 stages:
- Start by preparing a lightening agent. If necessary, mix the brightening powder or gel paint with the activator. Do this in a non-metallic container to avoid foreign oxidation products. Mix well the composition so that there are no lumps and grains.
- Take care of your hair - comb them so that there are no lumps and backs. Then the scalp is divided into 4 parts by partings, secure them with special clips. Wear gloves when dyeing. They protect the skin from chemical attack.
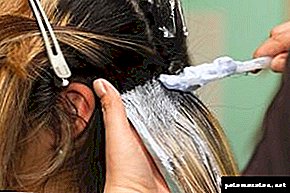
- We proceed to direct staining. Put on gloves and brush part of the mixture on the partings. Loose one part of the hair and in the direction from the occipital region - to the sides, begin to lighten. Try to minimally touch the colored strands. Carefully paint dark hair, do not feel sorry for the paint. With the edge of the comb, make frequent partings and paint them with a brush. At the end of the application of the composition, note the time.
- Periodically lift strands so that the roots breathe a little. If the paint remains, you can additionally stain the problem areas. Lightening is a process that needs to be constantly monitored. See how the bleeding of the curls goes as you move the applied agent away with the back of the working brush.
- Rinse with warm water and shampoo to maintain color. It is important to ensure that no hair particles remain on the hair. Such an error and inattention threatens with a yellow spot on the head of hair, which is now not visible, but after the next coloring will be an unpleasant surprise. To complete the clarification of the roots, apply a color stabilizer on the roots for 5 minutes. Wash it off and dry your hair.
Tip! The roots closer to the face stained last. Firstly, they are thinner and quicker to lighten, and secondly, hair damaged by dye is less visible on the back of the head.
If you are the owner of light and not dark curls, cosmetologists recommend turning to permanent paints. The principle of drawing on the roots does not differ from the dark. Cosmetic companies Garnier, Schwarzkopf, L’Oreal, Estel, which are well-known in hairdressing, also took care of this.
Lightening roots with dyed hair
The lightening of previously painted roots is slightly different from that of a natural color. The fact is that when dyeing inside a hair, natural pigments (trichosedrin, pheomelanin) are destroyed, the dye of a selected shade takes their place. In order for the hairs to take on the new pigment, it is necessary to perform decapsing (washing). In other words, remove the old dye.
Washing can be done using three methods:
- with the help of a strong oxidizing agent - it guarantees deep destruction of the problematic pigment, but at the same time it is very harmful for the structure of the hair itself. Deep wash provides clarification of curls on 4 tones,
- acid or surface remover is a more loyal method of bleaching pigments inside the hair. It provides clarification in 2 tones in one application,
- natural wash is the safest option. The unwanted pigment is removed by formulations of natural ingredients and cosmetic oils. The procedure does a minimum of harm, but to completely eliminate the dye one approach is indispensable.
Useful video coloring of roots in a blond at home:
From a professional point of view, products are considered popular means for deep and acid washes. Color off by Estel, Remake Color by Hair Lightspecial oil Vitality’s and Backtrack by Paul Mitchel. Even dark curls will not resist the impact of these funds. It is enough to put them on wetted strands for 20-30 minutes. Hair restoration will take 2 weeks, so at this time it is strongly recommended not to apply colorful formulations.
As natural cleansers We offer an easy recipe with salt. For the preparation of funds you will need:
- 1 tsp fine sea salt
- Shampoo,
- Liquid honey
To begin, thoroughly rinse the hair with shampoo with salt. Sea salt at will can be replaced with a pinch of baking soda. Apply natural honey to wet strands, perform a light massage with your fingers. Next, put on a plastic cap and wrap the hair in a towel. The effect of the mask is long (up to 10 hours), so it is recommended to perform the procedure before bedtime.
Subsequent steps in the dyeing of regrown roots are performed as with dark hair.
Tip! When choosing an agent for removing old pigments from hairs, it is recommended to focus on naturalness and harmlessness. Suitable methods such as lightening chamomile or lightening with honey. For weakened curls, strong chemicals can be disastrous.
Contraindications
It is better to postpone the procedure for dyeing the root zone in the following cases:
- there are lesions, wounds or acne on the scalp,
- hair weakened, damaged and brittle after previous dyeing,
- a little time passed after the perm and the curls have not yet recovered,
- during critical days and during the week before them,
- after using henna and natural dyes of this type,
- are allergic to paint components.
Recommendations from hairdressers
To lighten the roots did not lead to sad consequences and irritated scalp, hairdressers advise:
- before using the new paint test for allergies. The reaction is observed for 2 days and only then proceed to staining,
- wash your head for 1-2 days before the intended discoloration, so as not to burn curls,
- if you doubt the proportions and quality of the lightening agent, ask a professional for help,
- wash off the paint from the head of the head with warm boiled water or mineral water, but not running,
- after lightening for a few days, do not wash your hair so that the color is fixed, and the reactions inside the hairs have stopped,
- Do not discard toning after discoloration. Toning guarantees brightness and saturation of shades. Yellowness correction, and the hairs themselves are more protected from the negative effects of external factors,
- before the planned procedure, pay maximum attention to hair care and restoration. It is impossible to paint damaged and weakened strands,
- in the coming days, after bleaching, hot styling, ironing set aside.
Useful video of discoloration of strongly regrown roots:
What threatens improper clarification
If you do not follow the advice of professionals, there may be unpleasant consequences, which can be corrected a lot of effort, or you can wait until they grow and cut them off. Among them:
- high risk of harm to hair, burn them with chemical compounds,
- the curls will become brittle and lifeless,
- damaged strands become naughty in laying,
- hair loss increases,
- popped tips appear.
To reduce the risk of side effects, it is recommended to contact only professionals, and if it is already late, then read tips on how to fix a failed clarification.
Clarification of the roots is a difficult and responsible matter. No need to chase the white strands, if at stake their health and beauty. Do not be in a hurry, it is better to consult with a specialist once more than to recklessly trust your intuition and advice from a blonde girlfriend.
Answers to frequently asked questions about home hair lightening:
Lightening dark colored hair
- Since the hair is thin, you can use more or less sparing paint, but in our case you need to get out of the dark color, which worsens the situation. Therefore, to lighten using clarifying powder and oxidant 6%.
- Mix these two components must be strictly according to the manufacturer's instructions! First you need to do a test on the elbow, to avoid a possible allergic reaction on the scalp.
- Further, it is best to try to lighten one strand in order to know for sure that we were not mistaken and selected the right composition for lightening (after all, the hair is colored). Lightening powder should be plentifully applied to the strand from the root and along the entire length, and the tips should be left without paint.
- After 30 minutes, apply the solution on the tips, wait another 20 minutes and rinse. It should not turn white, at best there will be a blond with a strong yellowness, but when leaving dark colored hair this cannot be avoided and you will have to suffer.
The second clarification can be done not earlier than in a week. The tips during the second clarification need to be painted immediately. For the second clarification is quite suitable brightening powder without ammonia and oxidant 3%. Apply generously to hair and wait 40 minutes. The result is blond hair with a minimum of yellow.
Then we will have to get rid of the yellowness that all clarifiers, without exception, give. This can be done with shampoo toning or paint toning. Yellowing with bleached hair can be removed only by tinting; repeated brightening with paint or powder will not give the desired result!
Thus, you just need to correctly assess the original color and condition of the hair, then select the correct percentage of oxidant. For clarification usually do not use 12%, you can not only spoil the hair, but also get a scalp burn! Lighteners 9 and 12 percent are taken only in cases when the hair is thick and dark. But such experiments are best carried out under the supervision of a specialist.
How to lighten hair
The most common mistake is incorrect application of the brightening compound to the hair, and, as a result, burned locks. Therefore, we apply strictly according to this scheme:
- Apply the mixture in the first place on the roots, only then apply to the length and, at the very least, to the tips. You can not completely dye the whole strand, then the second - the first one will be burned while you dye all your hair.
- At first we put paint on an occipital zone. There, the hair is the toughest and worst of all is amenable to lightening, so you need to start with it, so that they can be clarified to the desired level.
- We lighten the temporal and parietal zones last, the hair is thinner there than on the back of the head.
- The area near the face, where there is a lot of short short hair at the roots, is lightened with the very last.
This is what the order should be when bleaching hair at home, and not as many girls do - first lighten the temples and the parietal zone, and at the very last moment the back of the head. That is why they get red locks from behind, they just do not have time to lighten, and the hair near the face by the end of the lightening is already starting to deteriorate.
Another rule for powder clarification is that it should not dry on the hair, if it dries out, it stops working and it just does not make sense to keep it going. Therefore, the mixture is applied to the hair in abundant, thick layer. Powder when lightening hair should go more than the paint, as the paint does not dry so quickly, and a thin layer of lightening powder dries very quickly.
After lightening hair must be tinted, as they become porous. Even if you are satisfied with the resulting color, and you do not want to somehow change the shade, then toning is still needed. In this case, you can even take a colorless paint.
How to choose a paint to lighten the roots?
In this case, it all depends solely on how dark you are from natures your hair. Some girls and women have enough paint that brightens by 2 tones to achieve the desired shade of blond, others need to use blonddoran, and then also tint their hair. It is unlikely that you will be able to determine on your own how strong your natural effect is and what kind of dye is best suited for your hair.
Therefore for the first time it is better to ask for help from a professional hairdresser and find out from him what exactly he uses for your hair. Next you need to buy paint and use it in home use. Most likely, to lighten your hair, you will need two colors: blondonoran and a tinting dye. Let's take a closer look at the steps of dyeing the hair roots so that you can do it at home.

Stages of lightening hair roots at home:
1. Cook the paint. In this case, you must follow the instructions in which the proportions are indicated. Almost all the usual paints that are sold in stores, consist of several ingredients that need to be mixed together without any calculations or calculations. It is very convenient for home use, because most girls and women have no idea how to dye their hair. Remember that the dyes must be mixed in a non-metallic container so that no additional oxidation process occurs. If you take a professional paint that needs to be diluted in certain proportions, carefully read the nuances in advance and consult with a hairdresser.
2. Comb your hair and part. For dyeing the roots, use only plastic combs that do not absorb the dye and do not violate the hair structure. Determine which part of the hair you need to apply the dye. In the future, you will need to make partings and each time apply a small amount of paint to the roots, so practice in advance to understand the technology.
Some women they apply paint with their hands, after putting gloves on them, but you cannot control the length you are capturing, and you can also miss out a few dark hairs somewhere. This coloring technique is well suited for dark hair or for tonic use. Blondes need to be divided and carefully brush each row.
3. Apply paint. For this stage you need a good synthetic brush. Remove excess paint on the edge of the container to avoid contact with skin or clothing. Make sure that each hair is covered with dye. Of course, it is quite difficult to highlight the root zone at home, but you will be quite able to discolor this area of hair. If you have a fairly pronounced pigment, which causes a yellow tint after bleaching, use additional toning paints. They are sold in any store of goods for professional hairdressers. Before re-dyeing, thoroughly wash the strands using a deep-cleaning shampoo. This cosmetic product perfectly aligns the tone of the hair, making it smooth, shiny and beautiful. If you buy paint with a blue or ash tint, then quickly and easily get rid of the unpleasant yellowness on the strands.
4. Wash your hair. One of the important stages of lightening the hair roots is washing the head. After applying the dye, your hair will become porous, dry and in need of nutrition. Therefore, you need to thoroughly wash off the tinting paint with deep cleaning shampoo and apply a nourishing mask on the roots of the head. You can also find it in any cosmetic store for hairdressers. The mask perfectly fills the pores and makes your hair healthy and beautiful. Dry your hair with a cotton towel and let it dry naturally.

Some more recommendations for blondes who want to brighten their hair roots:
- A few days before dyeing do not wash your hair. It is much safer to lighten the roots on dirty hair, covered with natural grease. So you reduce the harm of paint and can not worry about the fact that your strands will become brittle. If your head becomes very dirty, additionally use dry shampoo, which can be used to create the visible effect of clean hair.
- Do not save on paint. Many women come to the store and choose the cheapest paint, believing that it does not differ from the rest. In fact, this is not the case, because many manufacturing companies save on raw materials, and you, in turn, receive low-quality goods. Therefore, it is better to spend money on good paint than to regret about damaged hair.
- Do not paint with brightening paint the entire length of the hair. In order to lighten the roots you need to apply paint exclusively on this area, making a soft transition along the line of previously painted hair. So you do not harm the area that has previously been subjected to aggressive staining. Blondes should be as careful as possible, because Blondoran corrodes hair strongly enough and can harm.
- Do not refuse to use tinted paint.. Many women believe that this is a waste of money, so they simply do not buy toning paint. Any professional hairdresser will tell you that this stage is necessary, otherwise your hair will be vulnerable and dry. Each time after bleaching the roots, apply a small amount of dye to the entire length of the hair.
- Return to the contents of the section "Dermatology"
Lightening at home and in the cabin
Of course, it is best to lighten the hair in the salon, because there are real professionals who will not only choose the right background for lightening, but also use high-quality proven hair clarifiers. Before starting the bleaching procedure in any good salon, the master will carefully study all the features of your face and only after that he will advise you on the optimal shade.
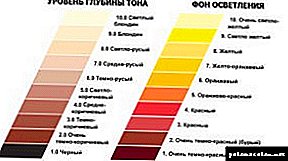 If you vysreshit spend lightening hair at home, you have to decide on the color and choose the appropriate means for bleaching. In addition, you will need to familiarize yourself with the color table, with which you will need to choose the optimal background of clarification.
In order to understand this table, you must first understand what the background of clarification is. Background shading is called shade, obtained after contact with a chemical oxidant on the hair. This table was created specifically for people to see how many stages of lightening their hair will have to be “lived through” to achieve a certain shade. After reviewing this table, you will immediately realize that it is more difficult to discolor black hair. For such a drastic change, a single discoloration will not be enough.
 If you decide to make your own hair brightening yourself, you should know that for this procedure you will need a special brightener:
Popular means to lighten hair
First place in our list of brighteners rightly takes the paint. And this is not at all surprising, because the overwhelming majority of women use it. So, in order to lighten the hair with paint it is necessary:
 refuse to wash your hair at least 3 days before bleaching,
- pre-purchase high-quality paint,
- prepare old clothes, a hat, a comb, a towel, a brush and a bowl,
- carefully study the instructions, as well as familiarize yourself with the seven inscriptions on the packaging,
- strictly according to the recipe specified in the instructions for the paint to prepare a mixture,
- change into old clothes
- test for an allergic reaction
- in case of a positive result, proceed to the bleaching procedure,
- you first need to comb your hair and then paint it on it,
- at the same time roots should be painted at the very last moment,
- if necessary, the head is warmed with a hat and wrapped with a towel,
- after the time specified in the instructions, the paint must be washed off with warm water,
- after that, it is advisable to apply a regenerating balm on hair, which will help the hair to “recover” faster after lightening.
 refuse to wash your hair at least 3 days before bleaching,
 Using paint, even black curls can be made light brown, golden, light yellow or become a true ash blonde. The main thing is to act in several stages and at the same time not to forget about caution, since lifeless tows are not the best decoration for a woman.
In contrast to the paint, lightening spray for hair acts more gently and carefully. Using this tool, you will not be able to quickly achieve the desired result, as the brightening hair spray when applied discolor the curls only a quarter of a tone. Lightening hair spray is not suitable for regular use. It is rather a temporary tool that is designed to produce a light brightening effect on dyed hair.
If you decide to brighten dark hair with a spray, you should be prepared for the fact that the result will be almost not noticeable. If you are interested in safe hair lightening, then the best option for you will be a mask made from natural ingredients. It is difficult to say what kind of mask for lightening hair is considered the most effective, because it all depends on the structure, natural color and degree of rigidity of your hair. Therefore, we suggest you to experiment and choose the most effective recipe yourself.
 The most popular lightening hair masks according to popular recipes:
- kefir mask. Thoroughly mix all the ingredients: 100 g of yogurt, 20 g of brandy, yolk, 1 tbsp. a spoonful of balsam and 2 tbsp. spoons of lemon juice. Apply for 3 hours. This mask will suit even owners of dyed hair. Regularly lightening blond or light strands with such a mask, you can achieve a stunning effect,
- lemon mask This recipe, unlike the previous one, is more suitable for dark-haired ladies. To prepare such a mask it is necessary to mix lemon juice and filtered water in equal proportions. The resulting composition should be immediately applied to the strands and leave for about an hour,
- mask of chamomile. Pour 2 tbsp. spoons of chamomile with a glass of boiling water and let the mixture stand for an hour. After that add 50 g of glycerin and apply on the strands. Wash off after 2 hours.
This mask is considered universal. She brightens well not only blond, but also darker hair, so even brunettes use it with pleasure.
 If you are not satisfied with the harmless, but ineffective masks, you can use another more effective hair brightener. With the help of the cream you can easily discolor your hair by making it lighter. Cream for lightening strands is applied not only on the light, but also on the black curls. It acts fairly quickly and is even suitable for colored hair. With the help of such a unique means for lightening hair as a bleaching cream, you can achieve amazing results even at home! The cream is easy to apply and spread over the entire length.
In addition to creams, sprays, paints and masks for lightening hair, you can use some other, albeit not so well-known, but still quite effective means:
- powder. Thanks to the unique components that make up the powder, straightening of the strands occurs almost instantly. The powder is used for both full and partial clarification. This hair clarifier does not contain ammonia. The mixture, which includes the oxidizing agent and the powder is a mild agent and can be used even to lighten fine hair,
 special powder. Lightening powder, unlike powder does not give such a noticeable result. Powder usually just update the resulting shade of clarification. Reviews of this tool are very different. Someone powder helped slightly lighten their natural blond color, and someone after using powder did not notice any difference. Be that as it may, but decide whether to use powder or not, everyone should independently. We, in turn, recommend that you apply powder on the strands between discolorations, as this will allow you less often to use paint, cream, spray or powder to lighten,
- Brightening hair oil. Oil helps discolor hair by about 3 tones. It acts very carefully and does not damage the structure of the hair. It is used exclusively on natural curls,
- Special Brightening Hair Gel. Gel can use not only blondes and fair-haired ladies, but also burning brunettes. It will help to quickly clarify the curls by 2 tones. This tool is suitable not only for the complete, but also for the partial clarification of the hair. Having discolored with the gel, you will get individual strands of a trendy effect this season as if it were true Californian highlighting.
 special powder. Lightening powder, unlike powder does not give such a noticeable result. Powder usually just update the resulting shade of clarification. Reviews of this tool are very different. Someone powder helped slightly lighten their natural blond color, and someone after using powder did not notice any difference. Be that as it may, but decide whether to use powder or not, everyone should independently. We, in turn, recommend that you apply powder on the strands between discolorations, as this will allow you less often to use paint, cream, spray or powder to lighten,
Such a light clarification of the hair roots will suit:
1. For pregnant women women who don’t want to walk for 9 months with grown ugly hair roots. It is neglected hair that immediately attracts attention. And it is increasingly difficult to hide the fact of pregnancy from acquaintances, employees and envious.
2. If the hair is badly damaged after the southern sun.
3. If you want to grow long hair, but do not change the shade.
This method has already been tested by me repeatedly. I share it with readers of the women's blog.
How to lighten hair roots gently:
1. The hair of the branch is about 1 cm (photo 1). I apply the mixture only on unwashed, dry hair.
2. I use powder and oxide "Estel", be sure to gloves, measuring spoon and cotton swabs.
3. For the preparation of the mixture I have enough 1 spoonful of clarifying powder and 2 tablespoons of oxide. Mix well.
4. I apply stripes with a cotton swab (the thinner the better, good - “herringbone”) with a lightening mixture on the regrown hair roots, while avoiding the skin (photo 4). This is especially true for pregnant women, so that the paint does not fall on the scalp!
So you have to "walk" through all the roots, dividing the hair into partings. The process is time consuming, but it's worth it! You can ask a girlfriend or mother to touch up your hair from behind and on top of your head. I got used to it myself, looking in the mirror.

After I worked up all the roots with a bleaching mixture with such difficulty, I withstand 20 minutes and thoroughly wash your hair.
5. Next, eliminate yellowing with a shampoo "Irida". Again, I remind you that pregnant women do this carefully, with gloves, to minimize the amount of ink on the scalp and hands.
6. So, part of the roots of the hair brightened, and some strands remained dark (photo 6).
7. As usual, after washing my hair I apply an air conditioner. I wash my hair. And then, on wet hair, I apply a few drops of a great product. "Estel" fluid shine.
8. I dry my hair without using a hair dryer. As you can see, the roots of the hair again do not catch the eye! (photo 8) So, for another couple of weeks, you can forget about lightening hair!
Tip: pregnant women can replace hair products "Estel" on ammonia free paint. The exposure time on the hair - as indicated in the annotations of paint. Although you can always dye your hair in a natural color and not suffer 🙂.
How to carry out the procedure of lightening hair without harm
 Probably every woman at least once in her life thought about how to lighten her hair without harm. And this is not at all surprising, because most girls would like to instantly turn into a luxurious blonde and at the same time preserve the natural healthy glow of their hair. So, if you are interested in how to properly lighten hair, we suggest you read some useful tips:
- Before you proceed directly to the discoloration, you need to think about what kind of paint is better to lighten the hair. At the same time, it will be necessary not only to choose a quality manufacturer, a suitable clarifier, but also to decide on the shade you want to get in the end,
- Before you buy a hair clarifier, you should carefully read its composition. It is better to give preference to clarifiers without ammonia, since they are considered to be more gentle and safe,
- Before you start bleaching, you should carefully read the instructions, which describe the whole process in detail, and also indicate the painting time,
- lightening hair can cause an allergic reaction on the skin, so before applying the composition to the entire length of the strands you need to carry out a so-called test for an allergic reaction,
- Most often, manufacturers of paints recommend bleaching hair at least 2-3 days before washing your hair.
 Any bleaching with chemical clarifiers, especially if they contain a certain percentage of ammonia, does not pass without a trace to the hair. Therefore, hair lightening should not be carried out too often. Professionals believe that how often hair should be discolored depends primarily on the natural color of the hair, as well as on how much tones it has been lightened. So, for example, if you are thinking about how to lighten dark hair, you should be prepared for the fact that after dyeing you will have to bleach the roots more often than for blondes, whose color difference is not so noticeable.
Summing up, it is worth saying a couple of words about the fact that bleached hair needs more careful care, care and constant “nourishment”. Therefore, if you decide to lighten your hair, be prepared for the fact that you not only have to tint the tips and update the color regularly, make various regenerating masks, but also use special means to care for colored hair.
How to lighten hair at home
At home, you can lighten the hair on several tones, while maintaining their naturalness and do not cause damage.
For those who zealously monitor their own health, it is unlikely that coloring compositions of chemical origin are suitable. They can recommend lightening masks, cooked at home.
- Firstly, their action has been tested and gives a positive effect.
- Secondly, naturalness will not lead to irritation of the scalp and other allergic manifestations.
Pluses lighten hair at home:
- Do not destroy the hair structure, but on the contrary, improve their condition.
- The roots are getting stronger, preventing hair loss.
- They are an alternative to expensive salon procedures.
- Will help avoid fragility and dryness of the hair, unlike chemical preparations for lightening.
- Availability of ingredients.
- Ability to carry out the bleaching procedure at home.
- Lightening hair at home has a single drawback - the effect of masks does not appear immediately. To obtain the desired color you will have to resort to a whole course of procedures.
How to lighten hair folk remedies
Do not immediately purchase chemical components for bleaching, find out how to lighten hair with folk remedies:
Golden tone hair will provide a decoction of chamomile. For its preparation, half a cup of plant material is poured on 0.5 liters of boiling water and steamed under a lid for 30 minutes. Then filter and rinse hair after they are washed with shampoo. The result will appear if the procedure was repeated 2-3 times a week.
Wash hair with shampoo, which was added 1/4 spoon of baking soda. Heat the honey in a water bath to a pleasant temperature and apply to hair. Distribute the tool over the entire length, cover the head with a film and warm with a towel. It is better to withstand the honey mask the whole night, then along with the brightening of the hair will receive the necessary hydration and nutrition. If you have broken ends, then thanks to this tool, you will get rid of them very soon.
 Lemon Juice
This citrus has long been known for its brightening properties used in the fight against freckles and pigment spots. To lighten the strands you need to get the juice from two lemons and dilute it with warm water. Rinse the solution with clean hair, do not wash it off for 3 hours. After that, rinse the hair with shampoo and air dry. The procedure is carried out every other day.
Nettle and chamomile
A tablespoon of chamomile flowers and the same amount of dried nettle leaves pour a liter of boiling water and insist under the lid. Wash hair, rinse it with broth and leave to act under a warming cap for 20 minutes. Prepare a solution of chamomile essence in a 1: 1 ratio and wet them with dried hair. To sustain an hour and at the end wash with chamomile broth, which is prepared at the rate of: 2 tbsp. spoons of flowers insist in a glass of boiling water for 20 minutes.
Brightening hair at home with food
To lighten your hair at home, you can use food.
Lightening hair at home kefir
 Kefir
Kefir
The natural ingredients that make up the kefir mask help accelerate growth and restore structure. To prepare folk remedies for lightening hair, mix 40-50 ml of kefir, 1 egg, a teaspoon of shampoo, 2 tbsp. spoons of quality cognac, juice from half a lemon. After thoroughly whipping, apply the mask on the entire length of the hair and fix it with a film for 8 hours.
Boil 200 ml of water, add 40 g of henna, 50 g of chamomile and 10 g of dry tea brew. Stir and cook the mixture for 5 minutes. The broth should be cooled and then pour 400 ml of vodka into it. Insist for 2-3 days, strain through several layers of gauze and squeeze out the remnants. The mixture is applied to wet hair, avoiding rubbing into the scalp, and aged 40 minutes without wrapping. Wash off the mask with shampoo.
Easy brightening hair at home
Several methods of hair lightening at home, below, will help discolor several shades. Choose folk remedies for lightening hair, but do not forget that the desired result is possible only if you regularly use the mask and the frequency of its application.
- Cinnamon oil One of the easiest ways to clarify is to purchase a pharmacy. It is treated as follows: before applying the shampoo, 4-5 drops of oil are added to it and mixed well. The action is to lighten the hair, in addition, they become thicker and acquire a healthy shine.
- Mask with cinnamon. Mix 4 tbsp. spoons of powdered cinnamon with 0.5 cups of honey and a glass of hair balm. For cooking, use dishes made of glass or ceramic, so you will be sure that it will not react with the mask ingredients. The mask is applied to clean, damp hair, divided into separate strands. Avoid rubbing into the scalp.
Fix the tool with a plastic bag and a towel, leave to act for half an hour. Rinse the hair with warm water, and if there are grains of cinnamon on them, then comb them with a comb with thick teeth.
After the course of the masks, you will notice that the hair has acquired a lighter shade, become silky, soft and thick.
Masks for lightening and treating hair at home
- Massage with cinnamon oil. It is known that with the help of massage, blood circulation is improved. Mixing cinnamon oil with burdock in equal quantities and massaging the scalp, you strengthen the hair follicles and ensure rapid hair growth.
- Mask with olive oil. 4 tbsp. spoons of powdered cinnamon and 3 tbsp. spoons of olive oil mixed with 200 g of honey and dilute the mixture with a glass of warm water. The resulting mask is applied to the hair and kept under a warming cap for 4 hours. Wash off the product with shampoo.
- Lemon and honey
For the mask, prepare the following ingredients: Honey - 50 g, lemon - 4 pieces, rhubarb root - 30 g, a mixture of calendula and chamomile in equal proportions - 40 g, table vinegar - 0.5 liters, alcohol - 50 ml.
Washed rhubarb root boil in vinegar for 10 minutes. After adding chamomile and calendula flowers to the saucepan, as well as the juice of two lemons, let the mixture boil for another 5 minutes. Remove broth from heat, cool it completely and add honey, juice of two lemons and 50 ml of alcohol. Strain the mixture and use to rinse hair. To do this, dilute tablespoon in 1 liter of warm water and rinse clean hair. For impact, leave no less than 10 minutes, but no more than 30.
Hydrogen peroxide to lighten hair
Rules for lightening hair with hydrogen peroxide
The effectiveness of the means is determined by the concentration of hydrogen peroxide and the time of exposure. To prevent burnt ends, you can not hold the mask for too long. Strengthening the reaction contributes to the addition of ammonia or ammonium bicarbonate. With thick and hard hair, I use 8-12% hydrogen peroxide, medium thickness - 6%, thin - 5%.
Preparation of peroxide brightening agent
 Hydroperit and peroxide
In order to prevent undesirable chemical reactions, prepare a mixture, use glass, plastic, chinaware. For application it is allowed to take a brush with artificial bristles and a plastic comb. To avoid burns and irritation do not wash your hair before the procedure.
- Mix 50 ml of water, 40 ml of shampoo, 60 ml of peroxide and 15 ml of ammonia or ammonium chloride.
- Before the procedure, conduct a sensitivity test, dripping a little bit of money on the skin behind the ear. If there is no burning and redness, proceed to the next step.
- Lubricate the forehead with a fat cream, wear rubber gloves.
- Apply an oxidizing agent quickly and over the entire length of the hair.
- Lightening hair at home with the help of hydrogen peroxide in brown-haired women occurs after several procedures, in blond hair after one procedure.
- To stop the oxidation process, you need to wash your hair and rinse them with a weak solution of vinegar or lemon juice.
- Repeat lightening is allowed no earlier than 2 weeks.
It is very important to follow the advice of hair care professionals to help keep them in top condition.
Share the post "Brightening hair at home: folk remedies"