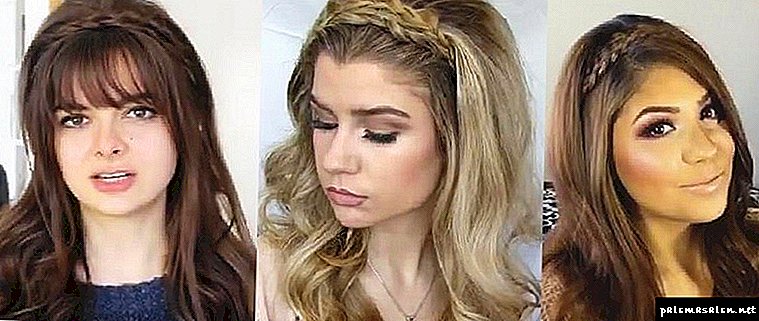
Hairstyle is an integral part of the image of each girl, as it helps to emphasize facial features and create your own unique style. There are lots of hairstyles for hair of different lengths, so there is no lack of ideas. But most of the representatives of the beautiful half of humanity simply lazy, because in order to make a beautiful and neat hair, you need to spend a lot of time. We present to your attention a great idea how to lay your strands: braid bezel! Let's look at how to create such a hairstyle itself.
Spit-bezel - what is it?
This weaving technique was invented by French women, who, as we know, are distinguished by remarkable taste and the desire to always look beautiful. Shortly after the invention, this hairstyle spread among women of a wide variety of nationalities. Russian women also adopted the method of weaving the "French" braid, because to build it, you do not need to have long hair: it is suitable even for short strands. Moreover, creating a rim of hair does not take much time. Of course, in the initial stages, when you will only learn to make a braid yourself, you will need to spend 10-20 minutes, but in the future you will be able to do this hairstyle in two accounts!
The braid around the head is a universal way to look unusual and attractive. This hairstyle is suitable for almost all cases:
- For everyday wear. So that your hair does not interfere, it is enough to braid them in front with a braid and bezel, and behind them they will fall beautifully on your back,
- For ceremonial events. This weaving technique makes an impression on others. Spit-bezel in any case looks spectacular, so it can be safely done for publication. If you want to add charm to your image, it is recommended to curl the strands with light waves,
- For the wedding. To look feminine and romantic, you can make a braid-rim to the bride for the wedding. But so that the hairstyle does not look too simple, stylists advise not to neglect hair ornaments, which will add solemnity to the look.
There are four types of braid rim: "French braid", "Dutch braid", "Dutch semi-hinge", "Braid-braid". To learn how to make them yourself, read on!
"Braid-string": how to weave?
The braid, or, as it is also called, the French half-mow, is woven almost the same way as the French braid, the weaving technique of which we discussed above. This hairstyle trudges even faster and easier. Let's look at the step-by-step technique for creating such a hairstyle:
- As in the first case, separate the top section of the hair from the bottom of the head. Hair that you do not need in the process of work, collect with a rubber band,
- Start weaving a braid, starting with the right or left side, but do not weave other strands into it. That is, your head will be decorated with a kind of "string" of hair,
- Secure the hair with invisible hairpins.
This technique of weaving is suitable for owners of quite long hair.
"Dutch Half-Corn"
The difference between the Dutch semi-beads and the Dutch braid is only in the fact that at the stage of weaving the rim you do not need to weave the hair into the formed braid, but simply create a hairstyle using the weaving technique described above.
Above are four techniques of weaving popular French braid rim. At first glance it may seem that it is very difficult to make such a haircut, but in fact, a few hours of practice will decide everything.
Variants of weaving

There are many options for creating a rim of curls!
Weave braids bezel can be carried out by different techniques depending on the skills and length of curls:
- in the classic three-strand fashionwhere the side are alternately superimposed on the center. This is the most familiar and affordable option, suitable even for those who are not used to doing styling with their own hands,
- in the form of a pigtail - “bundle” by twisting the strand - suitable for creating a quick-set laying, which can be fixed on the tip with a barrette,
- hairstyle rim of braids in the French style allows you to get a more voluminous styling and is suitable for owners of longer hair,
- in the form of a fishtail and two curls that intersect with each other in thin locks.
Tip! To make the curls more docile and easy to fold, you can slightly moisten the strands that you are going to braid.
Idea 1: a strip of bindings around the head in a simple version

The versatility of the rim of the weave allows you to do it with any haircuts and even bangs
So, consider first the simplest method. If you're wondering how to braid the bezel of the bezel itself, then the instruction below will tell you this:
- The most important thing is to choose on the sides of the head, in the area of the temples, one curl each. You can determine for yourself at what distance and how close to the face to do weaving.
- Each curl weave in one of the ways described above.
- After that, we put them parallel to each other in opposite directions.
- The tips of the weaves fix the studs on the sides.
Tip! If the length of your hair allows, it is not necessary to make two braids, one is enough, the tip of which you fix in the same way with a barrette. At the crown weaving can be additionally fastened with pins so that it does not move out.
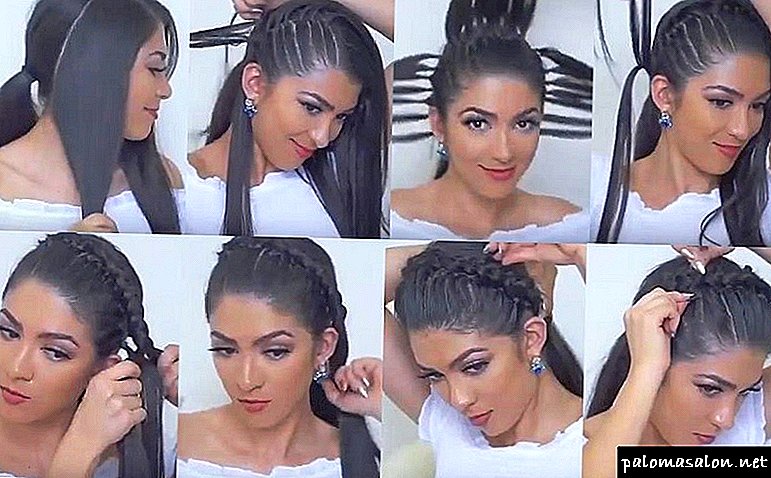
Idea 2: weaving face with grabs
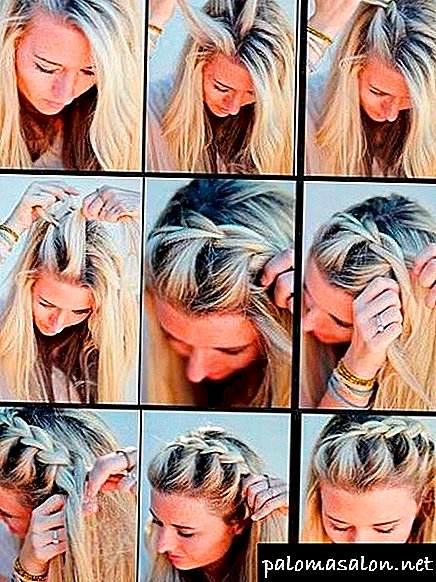
Step-by-step photo - instructions for weaving a face in the form of a "spikelet"
For girls who are active and who do not like to sit in one place, the instruction on how to braid a braid with bezel, which ensures its durability during the day, is more suitable:
- Gently combing the hair, parting part.
- From the most part of the hair at the edge of the parting, we select a small curl and divide it into 3 strands.
- On the middle strand, we alternately put two extreme, in which we add thin curls from the total mass of hair.
- It is not necessary to weave curls until the end; it is enough to reach the earlobe and decorate with a beautiful hairpin.
Tip! Such styling looks good also braided in the style of "fish tail".
Idea 3: weave the face with a bundle
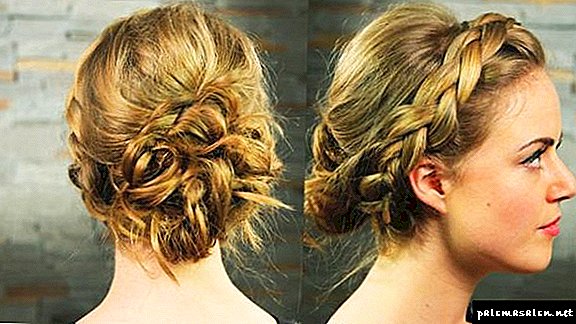
The photo shows an example of weaving around the head with a beam at the back
Quite an interesting way for those for whom it is not enough just to know how to weave a bezel of a braid, but you also want to get a complete image for any event:
- Comb and separate the first row of hair, which is closer to the face, from the rest of the hair.
- From the curls of the face do one or two weaves in any chosen way.
- We collect the remaining hair in a bun with a rubber band, donut or braid, which we fold and fix with pins on the sides.
- One or several braids, braided near the face, are applied around the head and fastened near the bundle, hiding the tip into it.
Idea 4: Experimental styling in the Greek style.

A variant of the Greek styling of curls in combination with unusual weaving in the face
With this option, you can experiment in different ways, creating new unusual variations. For example, how to weave a braid bezel in Greek style with an elastic elastic band, describes the following instruction:
- On the top we divide the head of hair into 2 parts.
- The first part is combed to the face and we put on her gum for Greek styling.
- In the second part of the shag of the plastic comb, we separate a small row of curls that we will use as pickups for the future bezel.
- In the first part of the temple, we choose a curl, divide it into 3 parts and weave a three-row pigtail, gradually adding hooks from the second part of the head of hair. Thus, we close the front weave gum.
- Having reached the level of the occipital region, we combine all the hairs behind and gently twist them around the elastic band.
Some useful tips
- Do not braid your braid on clean hair, because it fluffs heavily. You can wash your hair and on the strands that are planning to braid, apply a little foam or sprinkle with varnish. The result - a pigtail will be neater and durable.
- Experiment with different weaves: spikelet, French braid, tourniquet.
- Try not to braid the braid tightly, but tight enough so that it holds well.
Simple braid bezel: step by step instructions
This hairstyle will emphasize the beauty of long hair. Note that the length should be sufficient to lay the braid from ear to ear.
- If you have bangs or want to leave the strands released in front, then part from the temple to the temple, dividing the hair on the back of the head and forehead. Want to leave your face open, comb your hair back. To make the styling more effective, make a pile on the back of your head.
- Hair that will be loose gather rubber band in the tail, do not tightly tighten. It is desirable to do so that they do not interfere.
- Take a strand of hair near the temple closer to the back of the head and braid a simple pigtail. Secure it with a thin rubber band.
- Pigtail stack rim from one ear to another. On the opposite side of the head, lock its end with an invisible one.
- Spray varnish for fixation.
- If you wish, you can weave another braid on the other side of the head using the same algorithm and put it next to the first one.
French braid headband: step by step instructions
This styling can be done on almost any hair length, even short enough. The principle is almost the same as in the previous hairstyle, but with a few differences.
- Split the hair in a horizontal parting into a part that will be woven into the braid and which will remain loose, we collect it in the tail.
- Begin to weave a pigtail from the ear in the opposite direction, picking up several times each time.
- When you fly, fasten with a rubber band to match the hair and spray with varnish.
To make your hairstyle more spectacular, try to braid more braids, weave a ribbon or add flowers.
French braid do it yourself
If you want to remove the bangs from the face, then the hairstyle-headband based on the French braid is best suited for this. Thanks to her, she manages to gently remove hair from her forehead and make the look more neat.

Braid with loose hair braided in the following sequence:
- On the right, select the strand of hair at the base of the forehead, parting it over the ear.
- The remaining loose hair to collect in the tail. This is done so that they do not interfere in the process of creating hairstyles.
- Now begins the traditional weaving of the French braid of three strands. The hair is picked up by small strands on both sides of the rim and alternately superimposed on the central part. The direction of weaving is the opposite ear.
- Weaving need to continue and behind the ear to hide the ends of the hair. Approximately 2 cm below the level of the ear, the end of the pigtail can be fixed with an invisible hairpin or an elastic band.
- To put a braid behind an ear, and the hair collected in a tail to dissolve.
How to weave a braid around your head
Weaving braid rim around the head is a little different. Step-by-step instructions for this hairstyle is as follows:

- Behind the ear stands a small strand of hair and is divided into three parts. Weaving begins with the usual French braids, when the side strands overlap the middle.
- In the process of weaving, hair is added to the main braid with small bunches from above and below. The direction of weaving is in a circle.
- When all the hair will be woven into the bezel, the free weaving of the usual braid begins. Now you need to put it in the back next to the already braided French braid, and fix the tip with an elastic band and hide the hairstyle inside.
- At the very end, the braid is fixed with studs. Additionally, the hair can be fixed with lacquer.
Simple bezel of two braids
This hairstyle is suitable for hair of different lengths and structures, including short and wavy. Braid bezel braids can do it yourself without assistants. Before weaving, you need to prepare the tools: a comb, two invisible hairpins, hairspray.

- Behind the ears on the right and left side highlight small strands of hair. Weaving will start from here.
- From the selected part of the hair on both sides braid two small pigtails.
- Throw each pigtail on the opposite side, forming a bezel. Secure the loose end of the pigtail with a barrette.
- To hairstyle looked more impressive, the hair behind the rim can be combed and curled, or, conversely, to collect in a bun.
- Ready hair style fix varnish.
The second version of the rim of two braids is to braid them only on the left, and then throw them on the right side. After that the thrown braids gather in a bunch and are decorated with a beautiful hairpin.
Loose hair with a braid rim (French opposite)
The reverse French braid looks more voluminous and lush than usual. Therefore, this option weaving is great for creating a festive hairstyle. Additionally, decorative studs with beads and rhinestones can be added to the rim of the braid. The reverse French braid instead of the rim can be an excellent wedding hairstyle.
How to braid the braid, you can learn from step-by-step instructions:
- Above the ear, on one side, a small strand of hair stands out and is divided into three parts. Weaving of the French braid on the contrary, when the side strands overlap under the center one.
- In the process of weaving hair to the spit in small beams join the right and left.
- You can finish weaving in different ways. The first option is to get the braid behind the ear on the opposite side, fix it with an elastic or invisible and dissolve the remaining hair forward. The second option is to continue weaving in the same style and fix the braid at the back with a beautiful hairpin.
- If the hairstyle was performed for a solemn occasion, it is recommended to fix it with varnish.
When performing this option, the braid rim bangs are not recommended to hide. On the contrary, it is desirable to release the strands on both sides of the face.
Hairstyle-headband from the reverse French braid
From the reverse of the French braid, we get a beautiful weave around the head. It will be quite difficult for yourself to do it. However, it is very easy for the child to braid such a braid.

How to weave described in step-by-step instructions:
- Make a vertical parting in the middle of the head.
- Make a horizontal parting at the highest point of the head. As a result, the hair should be divided into 4 segments.
- The weave of the spit begins from the left lower segment. All the rest can be collected with rubber bands (each segment is fixed with a separate rubber band).
- Select a small strand and break it into 3 parts. Perform weaving reverse French braids with pickup beams from the outside and the inside.
- After a few steps you need to start pulling the hair to create a lush braid.
- Continue weaving in a circle, not forgetting to periodically pull the loops out of the braid. Braid the remaining hair into an ordinary braid, and gently pulling the hair out, make it bulky.
- Lay out the free braid in a circle. Fix it invisible and varnish.
Tips for weaving braids-rim
To master each technology of weaving braids in the form of a bezel is not difficult if you adhere to the following recommendations:
- Weaving is performed easier and faster on unclean hair. Therefore, if you only master the technique, you do not need to wash your hair before you do your hair. So learn the skill will be easier.
- Children's hair, especially after washing the head, becomes very fluffy and it is difficult to braid anything out of it. To make them more obedient, you can apply a little wax on them. Then the braid will turn out more accurately.
- Before you start working with hair, you need to prepare in advance all the tools and tools for fixing the strands and strictly follow the step-by-step instructions on how to perform the hair.
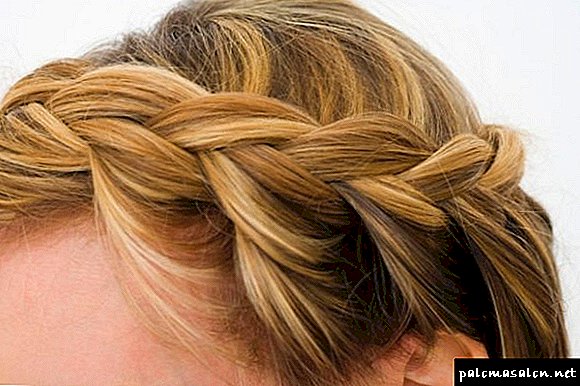
Fashion detail
The headband, made using only your hair, is considered a fashionable and stylish haircut, suitable for any age, but especially looking good in a young girl. You can make this hairstyle a person with any curls - straight or wavy, dark or light, and even short or long. An additional advantage is the possibility of wearing with any style of clothing - from business to sports.

The bezel is a fashion trend and is suitable for any wearing options:
Variants of weaving the rim of the hair with their own hands
There are several ways to weave a headband of hair. These include the use of a pigtail (single or double) or a French braid as a base. In addition, you can not complete the weaving to the end, and at the second temple to fix braided hair and hide under the rest of the hairstyle.

Fast version with flowing hair
In the absence of time for weaving and experience in how to make a rim of hair, a simplified version is possible - from two thin braids. In this case, again, can not do without a comb and gum. You will also need several "stealth".
On each side, the head in the ear area from the main part of the hairstyle is separated by two locks, choosing the thickness depending on your own preferences. Loose strands are fixed with barrettes. Each curl becomes the basis for the usual pigtails, the end of which is left equal to about 2-4 cm. They are fixed with rubber bands. Now you should wrap one braid over your head and fasten a little below the ear. The second is placed in parallel, retreating by 1-2 cm. And the remaining strands are either left free or placed in the hair.
Hairstyle with torsion for short hair
There is an option in which the bezel of the braid can not be woven, and twisted. Although it will require some dexterity and the presence of a comb, varnish and all the same "invisible". Curls are separated at each turn, fixed with varnish and twisted with flagella. Now comes the turn of the resulting braids around the head and fixing the hair from both sides.
Short hair requires some change in the process - here the separation of the hairstyle (2 parts should be unequal) is suitable, twisting the strands from either ear to the temple on the opposite side. In the course of work, you should introduce short strands into the braid, fasten with varnish and “invisible”.
Additional details
If desired, the hairstyle is easy to improve, increasing its uniqueness and adding a few elements of itself to the overall style. To do this, the bezel of the pigtail is complemented with the help of "invisible" and studs. If this allows you to make the style of clothes and events, the ribbons, large hairpins, chains and beaded threads woven into the hair will not interfere either. Large flowers on the rim look good with everyday wear or at a party. Approximately the same effect is exerted by several circular hairpins resembling a crown.
The image that complements the hairstyle of the pigtail bezel becomes more elegant and feminine. At the same time, it will not take much time to create it. And the result will be worthy and memorable.
Idea 5: fake bangs from weaving a face

Long bangs from interlacings serve as an excellent variant of an unusual and stylish styling.
Want to surprise everyone at the party? Then hairstyle - braid rim in the form of fake bangs will suit you:
- At the top of the head, divide the hair into 2 parts.
- Choosing a curl on the side, we make a classic weaving of three strands at any desired length.
- At the same time we begin to add small locks from the top into the upper curl.
- Thus, we braid a fake bang in a semicircle along the line of the forehead, the tip of which is fixed with a barrette.
On average, the price for complicated stacking in the cabin is from 1.5 to 4 thousand rubles, but you can do it yourself.
Now the question is how to weave a bezel from a pigtail to give your hair a neat look, you will not be disturbed, because you can choose any of the above options according to your mood.
Try to practice creating a hairstyle while watching the video in this article, in which you will surely find a lot of useful and visual information for yourself. If something is unclear or there are comments on the topic, you can leave them in the comments.
Hair band in the French Spit technique
Step 1. Start by separating the front section of the hair from the parting to the left ear. Remove the rest of the hair back and secure with a barrette.
Step 2. Take the hair section right near the parting (from the wider side) and divide it into three strands.
Step 3. Flip the back strand through the middle strand.
Step 4. Now flip the front strand through the middle strand.
Step 5. Slip the back strand over the middle one again, and then grab the loose hair that is at the same level with the first one, and turn it on in this strand.
Step 6. Next, flip the front strand through the middle one and include in the first loose hair that is on the same level with this strand.
Step 7. Repeat steps 5 and 6 until you reach the place at the tip of your left ear.
Step 8. Secure the braid with one or two stealth.
Step 9. Dissolve the hair, previously stabbed behind.

Hair band in the "Braid-lace" technique ("French Half-bears")
Step 1. Start by separating the front section of the hair from the parting to the left ear, remove the rest of the hair and fasten it with a barrette.
Step 2. Take the hair section right near the parting (from the wider side) and divide it into three strands.
Step 3. Flip the back strand through the middle strand.
Step 4. Now flip the front strand through the middle strand.
Step 5. Flip the back strand over the middle one again. (without braiding extra hair).
Step 6. Next, flip the front strand through the middle one and include in the first loose hair that is on the same level with this strand.
Step 7. Repeat steps 5 and 6 until you reach the place at the tip of your left ear.
Step 8. Secure the braid with one or two stealth.
Step 9. Dissolve the hair, previously stabbed behind.

Hair band in the Dutch Spit technique
Step 1. Start by separating the front section of the hair from the parting to the left ear, remove the rest of the hair and fasten it with a barrette.
Step 2. Take the hair section right near the parting (from the wider side) and divide it into three strands.
Step 3. Thread the back strand under the middle strand.
Step 4. Now slide the front strand under the middle strand.
Step 5. Thread the back strand under the middle again, and then grab the loose hair that is at the same level with the first one and turn it on in this strand.
Step 6. Next, pass the front strand under the middle one and include free hair that is on the same level with this strand in the first one.
Step 7. Repeat steps 5 and 6 until you reach the place at the tip of your left ear.
Step 8. Secure the braid with one or two stealth.
Step 9. Dissolve the hair, previously stabbed behind.

Hair band in the technique "Dutch Half-Corn"
Step 1. Start by separating the front section of the hair from the parting to the left ear, remove the rest of the hair and fasten it with a barrette.
Step 2. Take the hair section right near the parting (from the wider side) and divide it into three strands.
Step 3. Thread the back strand under the middle strand.
Step 4. Now slide the front strand under the middle strand.
Step 5. Thread the back strand under the middle again. (without braiding extra hair).
Step 6. Next, pass the front strand under the middle one and include free hair that is on the same level with this strand in the first one.
Step 7. Repeat steps 5 and 6 until you reach the place at the tip of your left ear.
Step 8. Secure the braid with one or two stealth.
Step 9. Dissolve the hair, previously stabbed behind.

This publication is a translation of a lesson from the popular beauty blogger and weaving specialist MissySue! You can find the original here. I also accept orders for translations of other lessons that interest you (unsubscribe in a personal or in the comments). Translation from Ray. ^ _ ^
Braid headband with flowing hair
The easiest and most common way to weave a rim from a braid, more precisely, from two braids, is as follows:
- Lift the hair at the crown with regular hair.
- Separate the strand under the bulk of the hair approximately above the ear and braid the usual pigtail.
- Tie the resulting pigtail with a rubber band and fluff it up by pulling out its segments.
- Do the same from the opposite side, that is, above the second ear.
- Stretch the tip of each scythe to the opposite ear and stab it.
- To straighten a hairdress, having disguised places of fastening of braids.

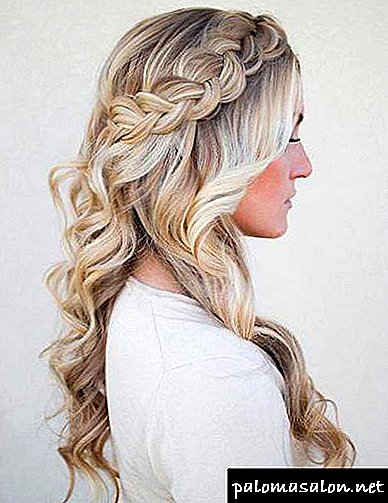
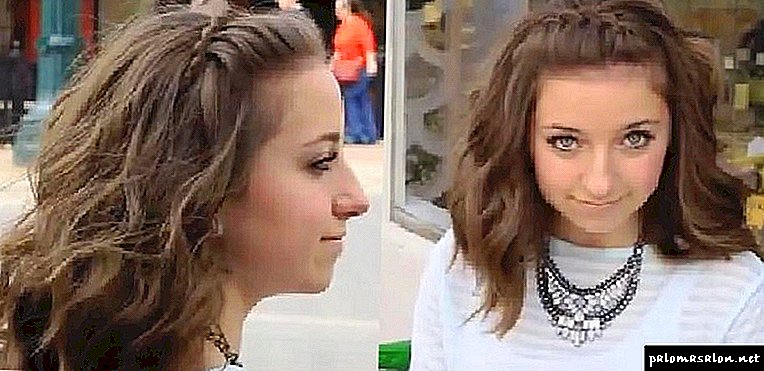
Romantic look made with a twist braid rim

Another variation of the classic performance of the braid rim in combination with flowing hair, giving the image of romance and originality.
In this hairstyle, the bezel is braided using a rope technique:
- Separate each side of the pile by a small strand.
- Split each strand into two parts and twist with a cord.
- Stretch the ends of both strands to the opposite side and stab.

The first way:
- Separate hair into front and back.
- The back of the collect in the tail, so as not to interfere.
- Start weaving with a thin strand above the ear and from the front of the hair braid twisted French braid.
- It is necessary to move parallel to the forehead, and add new strands to the braid only from the extreme side and place them under the next one, and not on it.
- Pull up a pigtail, tie a rubber band, wrap it under the loose back of the hair and stab it.
Spit headband for short hair (5 ideas)

- French braid headband:
- Divide hair into two parts - front and back.
- From the front of the usual braid spikelet, starting with a thin strand near one of the ears and adding locks only from the side of the forehead.
- Fasten the braid under the loose hair left behind.
- Double Danish braid - bezel:
- Grab a thick strand of hair in front and divide it into two equal parts.
- Temporarily kill the far half so as not to interfere.
- From the near half, starting from the side, braid a voluminous Danish braid (twisted French), add it to the tip with an ordinary pigtail and tie it.
- Do the same with the far half, previously killed.
- Fluff pigtails and disguise their tips under the mass of hair left behind.

- Bulk Danish braid on the side:
- The weaving technique is the same as with two Danish braids, only the strand does not need to be divided in half, but immediately braid one volume braid-bezel.
- Twist Spit:
- Separate the front of the hair.
- Take a thin strand of parting, divided into two halves and twist them with each other.
- Grab another strand from the loose hair left in front and twist it from one of the halves of the first strand.
- Next, turn the flagellum to twist with the second half of the first strand, just need to twist in the opposite direction.
- To make such manipulations with all the hair of the front of the hair, moving down to the ear.
- The resulting pigtail twist secure with a rubber band, and hide the tip under the hair from behind.
- Viking style braid:
- Divide hair into two halves with a horizontal parting.
- At the front, at the level of the central parting, separate the strand of hair so that it is in the middle of the head.
- From the far edge of the obtained strand, separate the small strand and, moving towards the forehead, braid an inverted French spikelet.
- When the hair runs out, divide the remaining end into two halves and braid a regular pigtail from each.
- Dissolve the resulting pigtails in different directions and hide the tips under the rest of the hair.


Weave braid rim of small tails (of rubber bands)

- As with the weaving of any rim, you need to divide the hair into those from which the braid will be woven and those that remain loose.
- Part for weaving divided into small locks, making each tail with a silicone gum in hair color.
- Moving around the head, braid a scythe made of rubber bands - split the first tail in half, hold the second between its halves, and tie the ends of the first to the next tail, split the tail in half, which now became the first and hold the next between its halves and so on until it ends tails
- Secure the tip of the braid of the gum under the remaining hair (you can stealth or tied with elastic to a thin strand of loose hair).
- Straighten the braid, stretching the segments.
Thin bezel imitating French waterfall
- Comb the hair and part lately to the middle of the head.
- Separate a small strand from the greater half of the parting and braid the usual pigtail of their three strands.
- Slide your fingers into the first segment of the braid and stretch a thin strand captured near the forehead (front to back) through it.
- Consistently stretch the strands in each segment of the braid along the forehead.
- After reaching the temple, hide the remaining tip of the braid under the flowing hair and stab it.
- Straighten your hair.

All the above-described variants of the braid rim can be used not only with flowing hair, but also with a tail, a bun or any other styling.